Altair-X (4-row) Learning Guide - Page 4
Layout techniques
Everyone will have their own preferences for how to set up their layers - for inspiration, I’ll leave some ideas below.
Beyond the number row
The stock keymap has the number row at the top for preserving the typical “number row” feel - reaching upwards to type numbers as you’ve likely done all the time.
However, if you type numerals often, you may want to optimize it further.
Home-row numerals
 Straightforward enough.
If you type numbers all the time, may as well place them in the most convenient location - right under home position with basically zero finger movement.
The virtual numpad
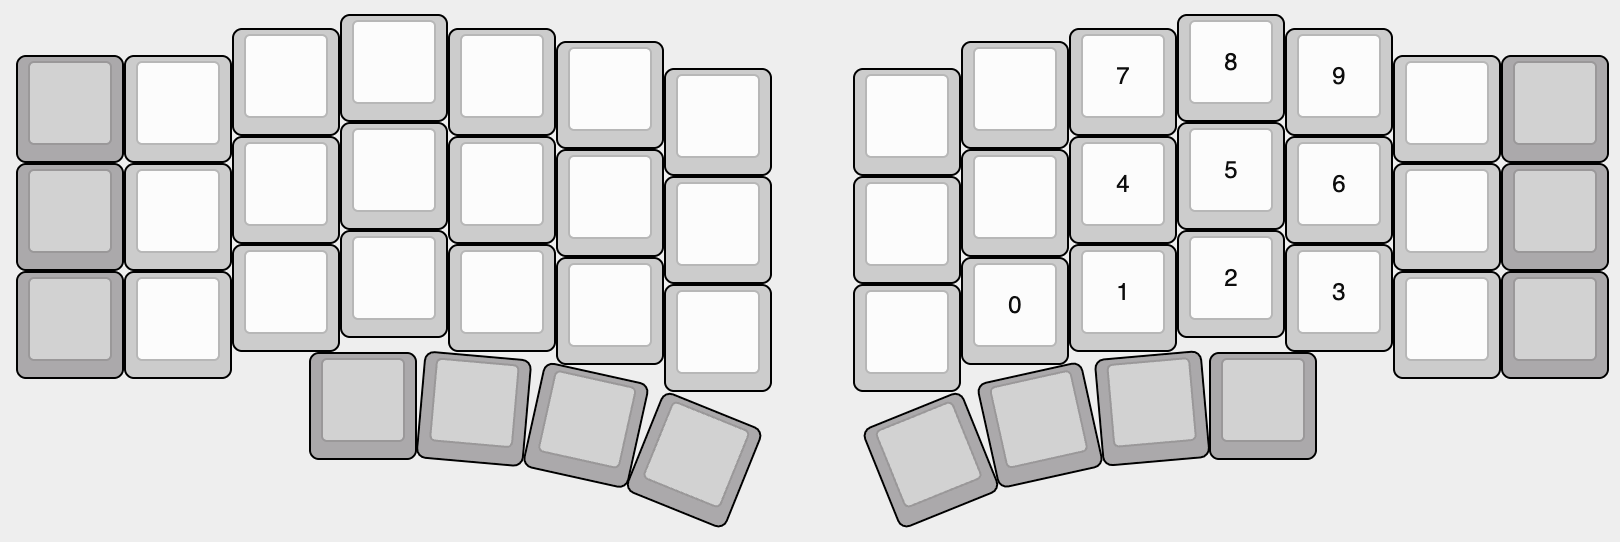 Also fairly straightforward.
By placing all the number keys in a grid, you can type all of them one-handed if the layer key for them is also on the same side.
In addition, you can tap into numpad-shape muscle memory.
One unique characteristic of this method is that it allows for placing a virtual numpad on both halves at once - by doing so, you can have one set of numrow keycode keys and another of numpad keycode keys.
This may be desirable if you use CAD or modelling software that relies on numpad keys for navigation.
The two-row grid
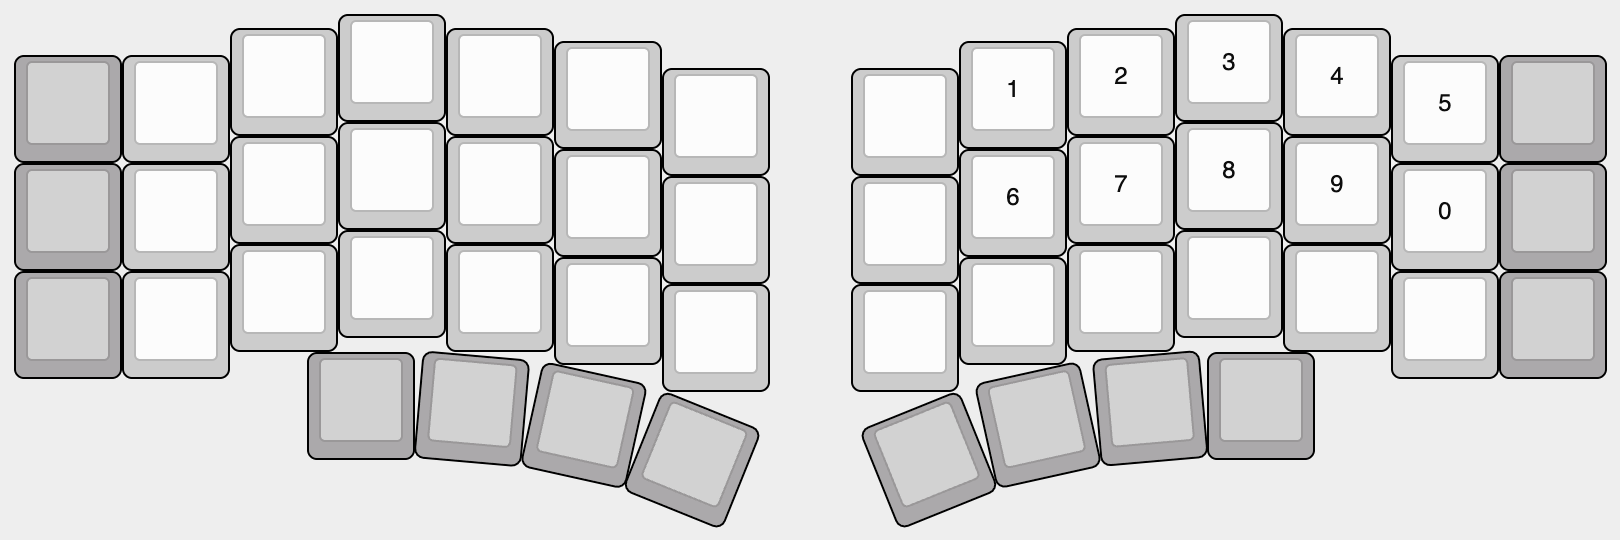 A fairly un-standard numbers placement.
Might need some muscle-memory adjustment, but allows for typing the entire numrow single-handed while also leaving the entire row of keys below for other uses.
Navigation
The stock keymap attempts to preserve the usual inverse-T layout while tapping into symmetry for simplicity.
However, you might desire something else.
The Vim navigation
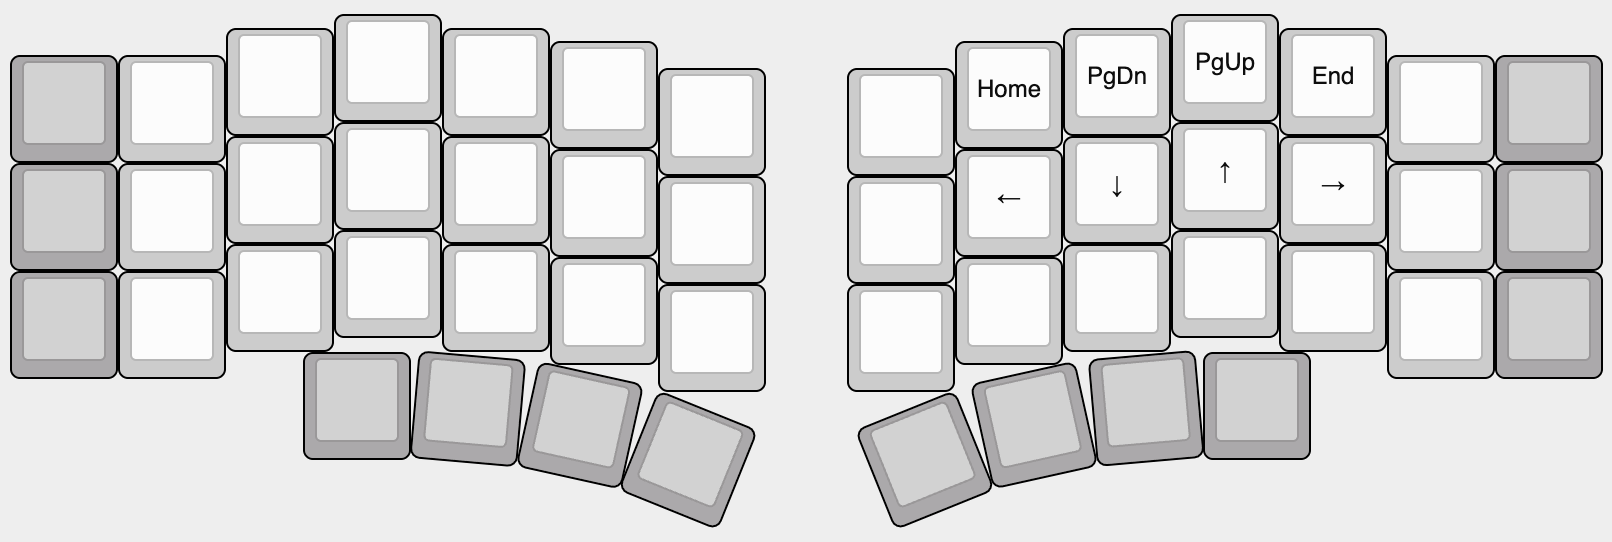 Every software developer probably saw this one coming.
A decades-old one-row navigation layout that will integrate seamlessly with many programs that implement it.
Its one-row structure makes it possible to place the “larger increments” variants above or below.
Shifted Vim navigation
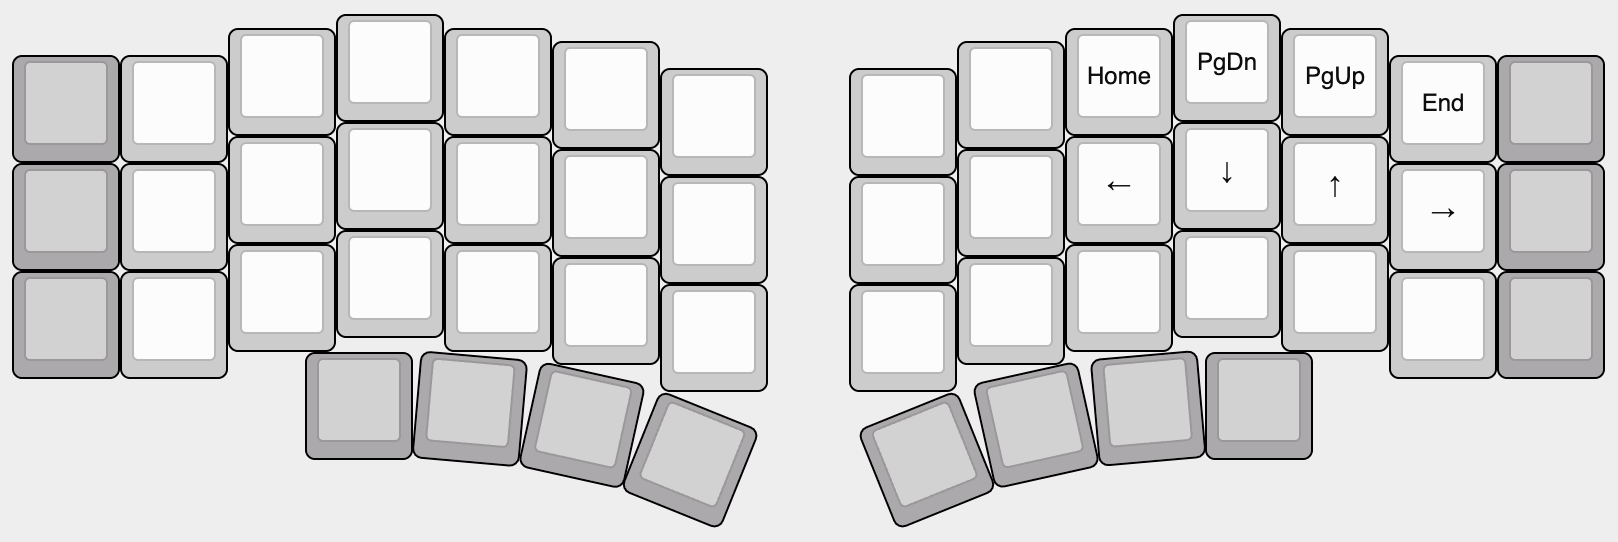 The same as the above, except shifted one key over to land right at home position for truly 0-finger-movement navigation.
Layer Toggling
By default, the Altair-X keymap uses the MO() momentary layer toggles to replicate the shift-style typing which most people are used to.
However, if you don’t prefer to hold the layer key while using the arrow keys, you can swap them out for layer toggle keys - one press to switch to arrows, then another to revert back.
See the layers page on the QMK docs for more info.
Other layout ideas
Whether any of these appeal to you will likely depend on which programs you use on a regular basis.
Function grid
 This places the function keys in an easily accessible grid for one-handed use.
Whether you want the F1 row to be on the top or bottom will depend on your preferences.
Single-handed symbols
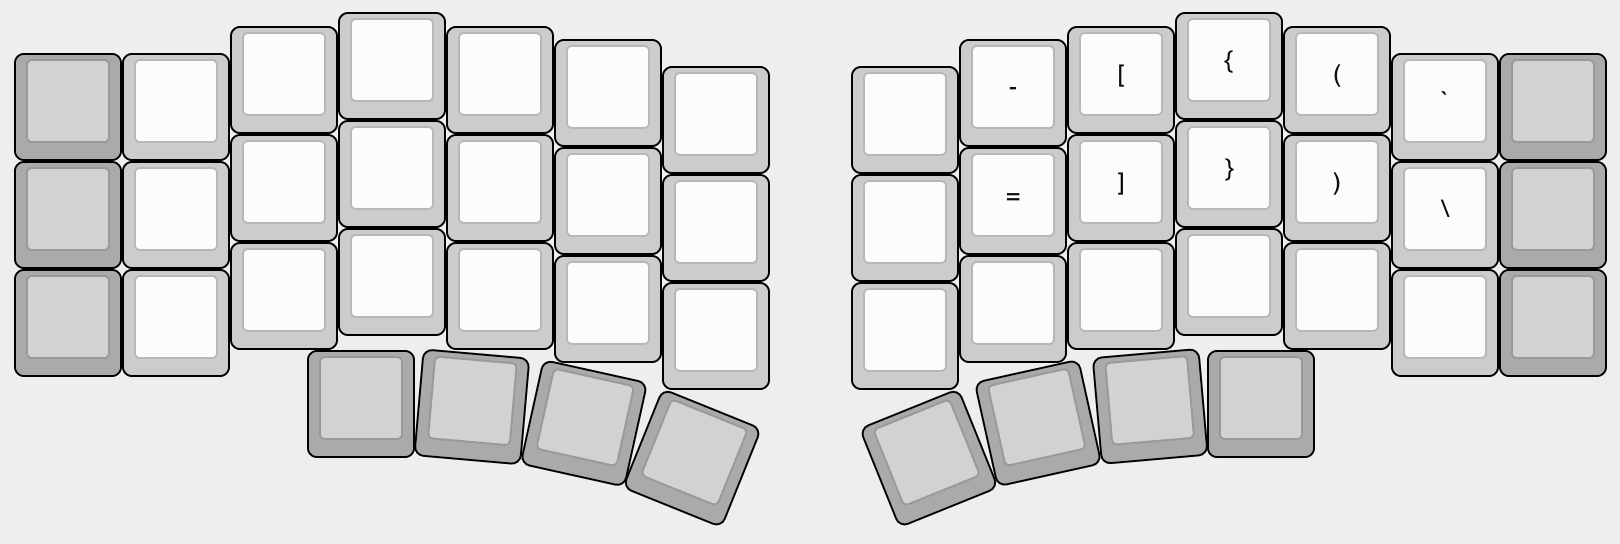 Stacks the stock symbol layouts atop each other, allowing one to type all brackets and whatnot with a single hand.
This leaves an entire row free below for additional quick-access symbols.
Vertical brackets
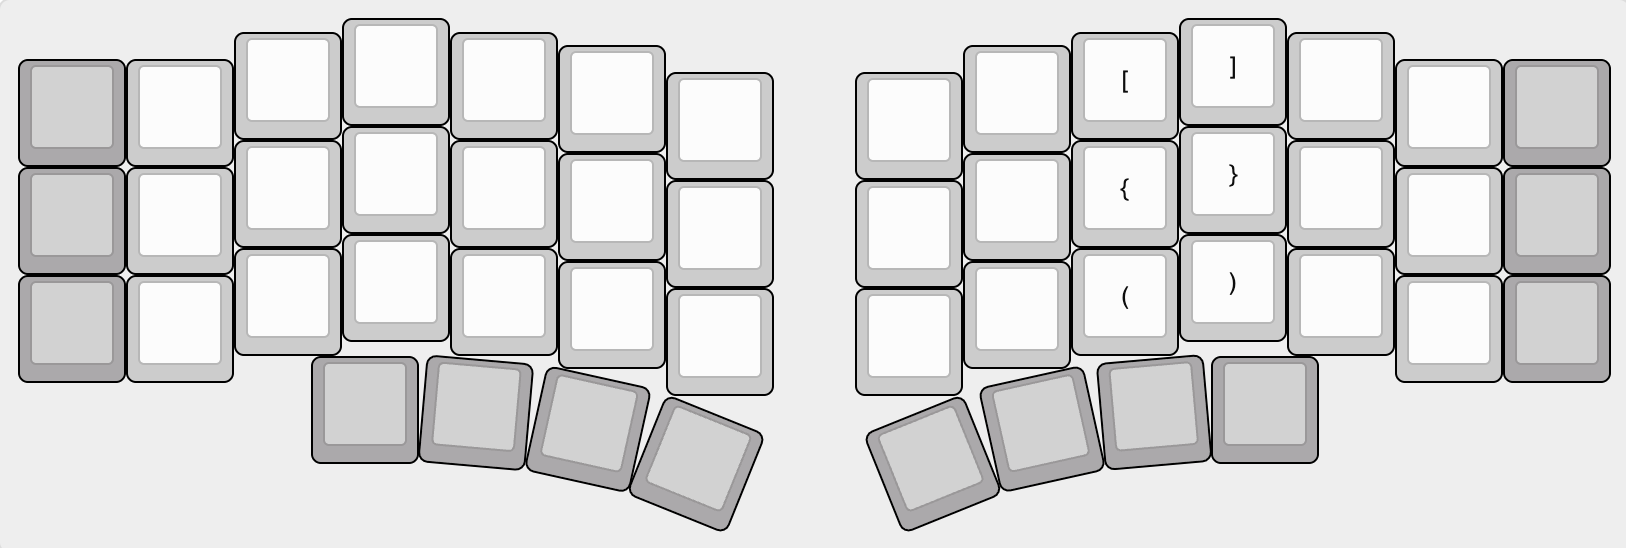 Key layouts don’t necessarily need to be horizontal - placing them vertically takes advantage of being in-line in column stagger, allowing you to move your finger accurately up/down to find them.
Beyond two layers
The stock keymap keeps things to three layers (the base layer + nav and num) for the sake of simplicity and memorizability - there’s nothing preventing you from adding more.
The stock firmware includes 6 layers by default - feel free to experiment with what works best for your needs.
Endless possibilities
Your Altair-X will continue to evolve as you find new optimizations and creative ideas - as well as re-evolve as your workflow changes over time and your keymap needs change accordingly.
Feel free to share and discuss keymaps with others (for example in the ai03 Design Studio Discord) - you might find the idea you’re looking for from someone else, and your ideas might be just the thing that someone else needs.
And with this, the Altair-X learning guide comes to a close.
Once again, thank you for choosing the Altair/Altair-X - it is the current culmination of my journey to the endgame keyboard, and I hope that my efforts reflect in its function and performance.
Your trust in the project allowed it to come to life, and I offer the deepest gratitude for making this project possible.