Altair (5-row) Learning Guide - Page 3
The daily-use bar
You’ll definitely need a bit more than just the alphabet for daily use, so let’s tackle that bit next.
The modifiers
The Altair comes with slightly different modifier layouts compared to a usual keyboard owing to the difference in the number of keys, but the general gist is the same.
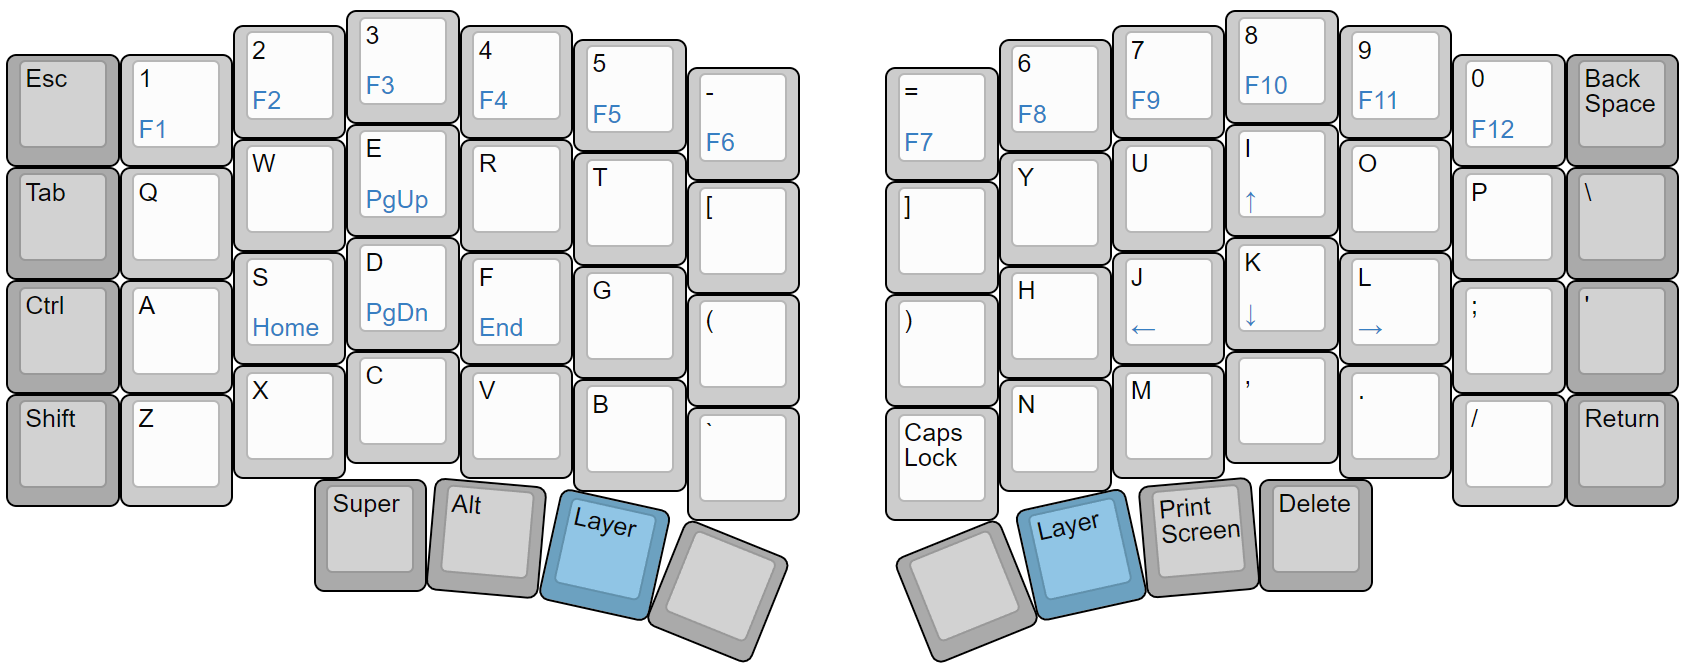
For now, let’s focus on the keys marked in grey.

Let’s start with the simple ones:
- Escape - At the top left as expected.
- Tab - One row down as expected.
- Shift - To the left of Z as expected.
- Backspace - At the top right as expected.
- Pipe/Backslash - One row down as expected.
- Alt, Super - On the bottom row to the left as expected - although possibly a bit shifted in position compared to the usual.
Now, let’s take a look at the big differences.
-
Control - This sits at the “caps lock” position.
If you’re used to the Happy Hacking Keyboard, Control-Caps layouts, or any layout that generally swaps caps lock and control, you’re likely already used to this.
If not, this might take a bit of time to get used to, but from my experience the transition goes quickly once you experience the benefits - vastly less strain on the pinky, much easier reach to all of your shortcuts.
Try your usual shortcuts such as “control-s” comparing the effort of curling your pinky down to where control usually sits versus where it is on Altair, and you’ll quickly notice the effortlessness. -
Enter - This sits one row down, roughly at the “right shift” position.
If you’ve used ergo or ortho layouts before, you’ll likely be used to this one as well.
If not, this one might take a bit of getting used to, but from personal experience, after a bit of strangeness at first, this also becomes second nature.Note: Some people prefer to swap the single quotes and enter.
I recommend starting with the stock layout first since I personally felt that it was smoother to transition to, but if you feel otherwise after maybe a few days of use, try swapping them around in VIA configurator.
For Mac OS users
The modifier keymapping will mostly be the same, but you’ll need to swap out the keycodes due to how Mac OS handles modifier keys.
Open up VIA configurator, then assign the following keys:
- “KC_LGUI” (the Super/Win key) behaves as Command.
- ”KC_LALT” (the Alt key) behaves as Option.
- ”KC_LCTL” (the Control key) simply behaves as Control.
How you assign these keys is up to you, but the two big options are as follows:
- The “keeping this as close to the stock keyboard as possible” approach.
From the keymap shown above, keep Ctrl as-is, place Command to the left of the Layer key, and place Option to the left of that. - The “arguably more comfortable to use than stock” approach.
From the keymap above, place Command where Ctrl is, place Option to the left of the Layer key, and place Control to the left of that.
As someone who recently migrated from Windows to Mac, I spent some time going back and forth; I personally found the latter to be more comfortable for daily use.
The bottom-right modifiers
On the stock keymap, the bottom row right modifiers are bound to print-screen and delete by default.
These are just examples of things that might be convenient to have right within a thumb’s reach, so try swapping in some other keys there depending on your personal workflow.
Some recommendations are as follows:
- Tab - Being able to quickly tab or shift-tab can completely change the experience of writing code or documents.
This is my personal preferred key for where print screen exists on the stock keymap. - Print screen - If you capture screenshots all the time, having it very accessible might be of benefit.
- Delete - Being able to quickly press delete without reaching far can be very useful for media editing, CAD, software, and similar.
This is my personal preferred key choice for the rightmost bottom row modifier. - Caps lock - If you type a lot of capitalized phrases for professional documents, having a quick toggle at the thumbs can be of interest.
- Backspace - If you use backspace more than delete, having it on the bottom row might be useful.
My recommendation is to avoid this trick if you want it there purely for fixing typos while adjusting to the Altair layout - once you get used to the layout, it’ll become obsolete. - Right alt, Right control - If your usual programs require these specific keys.
To begin, my recommendation is to just bind the two keys to something and move on for now - you’ll quickly figure out exactly what you want as you get used to the layout.
The inner column
This is a unique feature of Altair’s layout - having an extra set of keys between the G and H columns.
While the stock keymap has them bound to some generic defaults, these keys you’ll likely want to experiment around with a bit - what you end up binding them to will likely depend purely on your day-to-day workflow.
Some examples are as follows:
- Brackets for writing software* (More advice on this later)
- Media controls
- Virtual desktop switching, Tab switching, and App switching shortcut macros
- Macros for common shortcuts used in your daily-use programs
One note is that they’re a bit more strainful to reach than the other key positions - you’ll likely want to delegate these keys to keys you need swift access to, but not keys that you want to press extremely often on a regular basis.
Personally, I have them bound to the virtual desktop/tab/app switching shortcuts, allowing me to effectively multiply the monitor space I have with one tap.
Numbers
This one’s fairly simple on paper - reach up to the uppermost column to enter them.
It might take some time to adjust around the 5/6/7 keys which tend to be ambiguously positioned between the left and right hands on a row-stagger board, but in general it should start making reasonable sense due to it being 5 fingers per hand and 5 numbers per hand.
In general, two keys upwards from home position tends to be beyond the limits of comfortably pressing with wrists completely anchored down - it may be helpful to slightly lift the wrists and move the entire hand upwards to reach them.
If doing so, take care to keep the movements parallel to the columns so that the fingers don’t misalign afterwards.
In the long run, as you get used to the Altair layout, you might find that the number row ends up the most difficult to reach compared to the rest of the keys.
A future step of this guide covers numrow migration to bring the numbers closer to your fingers instead of the other way around - keep this in mind if you just can’t get used to the physical number row.
Introducing the layer
This is where Altair truly gets interesting - the layer keys.
By default, there’s the same layer key on both sides of the spacebar, and they both do the same thing.
They act similar to the shift key in how it changes what gets typed as you hold it, but with the upside of being able to completely dictate what you want changed when held.
On a regular row-stagger layout, there’s simply no easily accessible layer key position physically, but on Altair, it’s extremely convenient and effortless.
So let’s begin.
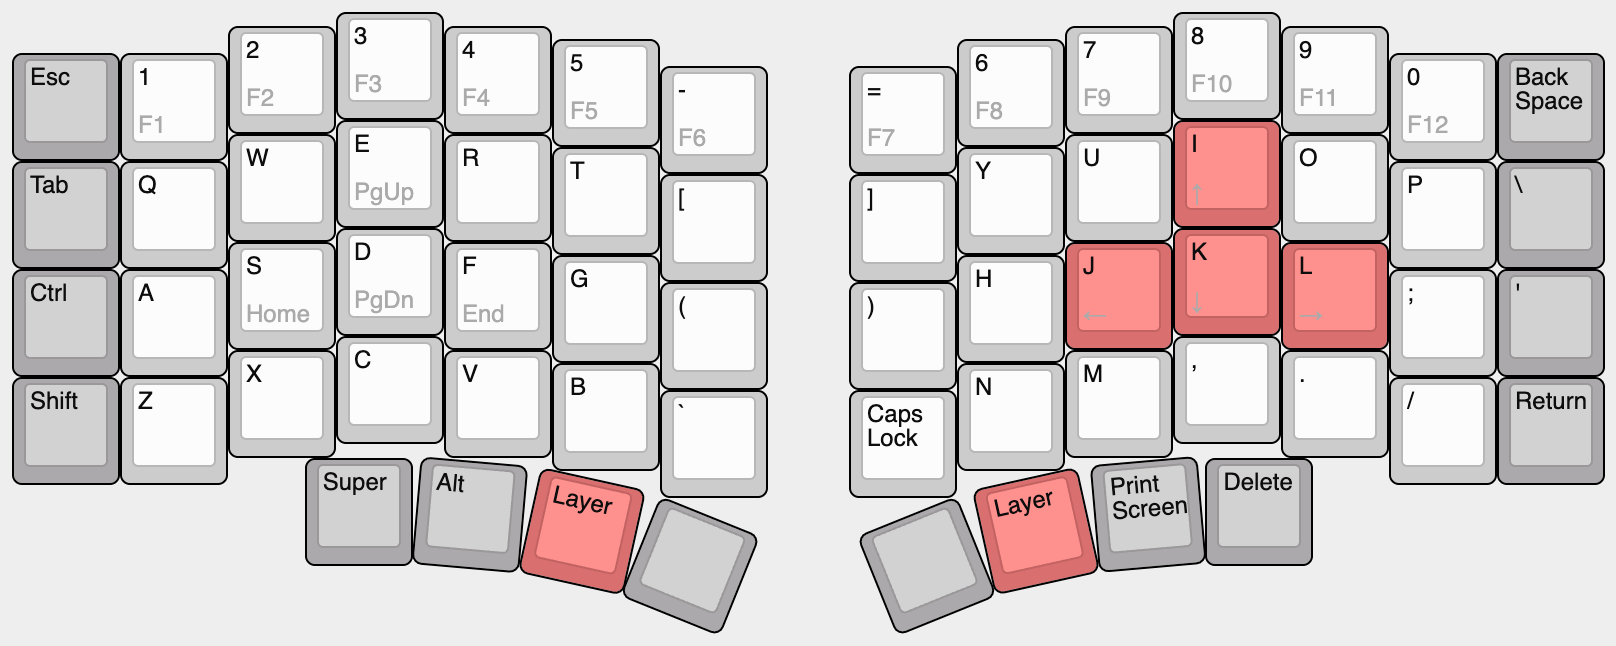
Try holding one of the layer keys, then press I/J/K/L.

Voila - by pressing the layer key, arrow keys have been brought to you right at the right-hand home position.
Repeat for the left hand using E/S/D/F, and you’ll find that it has turned into Page Up/Page Down/Home/End in a similar manner.
No more reaching far for the arrow keys - enjoy the convenience of having the keys brought to you instead for a zero-wrist-effort typing experience.
Finally, test holding the layer keys while pressing the numrow, and you’ll find that it’s transformed into F1 through F12.
One extra keymap feature
As you start adjusting the keymap based on your preferences, one thing to take note of is that the upstream half (the side connected to the computer) determines the keymap on split keyboards running QMK firmware.
This means that the keymap you saved onto one half will not be there if you plug the other half into the computer instead.
This can be used to store two completely different keymaps that can be activated on the fly by simply plugging in one half or the other - for example one mode for work and one for gaming, one for Windows and one for Mac OS, or whatever your heart desires.
If you want the same keymap on both halves, simply export the keymap, plug the other half in, then load the exported keymap file.
So what’s next?
By default, that’s honestly all that Altair’s layout has - through this deep dive, you’ll likely feel that it’s not all-too-complicated or extreme.
This is by design - Altair is designed to be as easy to migrate to as possible, reducing the complexities so you can focus on training muscle memory effortlessly instead.
Try using Altair for regular tasks for a while - you’ll likely find your ideal mappings for the inner macro columns, bottom row modifiers, and similar.
In addition, you’ll start dialing in your alphas typing, and both accuracy and speed will start returning to (or exceeding) what you’re used to with more typical layouts.
However, the more you get used to Altair, the more you might wish for an even more optimal layout.
Something that taps more into the power of layers.
Something that goes truly zero-effort typing with no reaching upwards for the numrow.
Something… that might effectively be usable without the numrow at all.
This is where I reveal Altair’s biggest secret feature - simply by remapping the keys, you can convert it into an Altair-X and back.
By doing so, you tap into all of Altair-X’s layer convenience and power without the need to go buy another keyboard.
This is also where the Altair and Altair-X learning guides begin to overlap.
If you desire this next jump after getting used to Altair through some general use, click below.
The Power-User Jump